Yucantan Chicken with herb rice
Mexican chicken recipes are very appealing to the Indian pallet (at least to mine), they are flavorful, rich in spice and delicious. After going time and again to my favorite restaurant in London Wahaca and ordering the same dish time and again, i decided to try it at home and the results were pretty impressive!
Ingredients:
Chicken thighs – 3 (large)
For the marinade:
Oranges – 2
Lime – 2
Lemons – 2
Garlic – 5 cloves
Jalapeños – 2
Ground cumin – 1 tsp
Cayenne – 1/2 tsp
Dried Oregano – 1 tsp
Salt – to taste
For coriander rice:
Coriander/Cilantro – 1 bunch
Mint – 1/2 bunch
Lime – 1
Salt – to taste
Rice (dry) – 1 cup
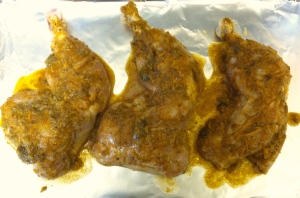
To prepare the marinade, juice the oranges, lemons and lime also getting some orange and lemon zest. Add the dry spices and minced garlic and jalapeño. Marinate the chicken in this and let it stand for 2-3 hours. Preheat the oven to 450degs and then cook the chicken at 400 for about 35mins. I had gone for chicken thigh pieces so I did not run too much chance of drying out the chicken. If you decide to go with some other part of the chicken you will need to adjust the cook time and temperature accordingly.
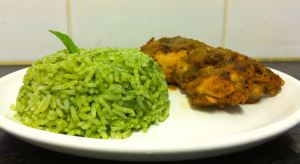
For the herb rice, clean and grind the herbs together with salt and lime juice. Then add it to the cooked rice & plate up.
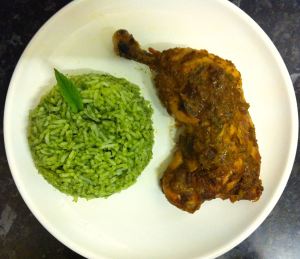
My achievement for this one was that I also tried to butcher the chicken and clean the bones (look at the clean sockets on top). I have to admit that it took me awfully long to get there but it was a fun learning experience. I decided to use freshly juice the oranges, lemons and limes. I even went to the extent of roasting and grinding fresh cumin. Because of all this it was quite labor intensive but at the end it was well worth it. I am quite certain if I had used ready made juices, it wouldn’t have tasted half as delicious as it did – all in all a Sunday well spent!
Zucchini rolls
Zucchini or Courgette is a very light veggie and goes well with pasta’s, salad’s and I personally think its lightness makes it a great starter for any party!
Here’s a quick (under 15 min) and delicious Zucchini rolls stuffed with olives recipe that is bound to be popular with any crowd.
Ingredients :
Zucchini – 1
Green Olives – 5-7
Oregano – a couple of pinches
Salt – to taste
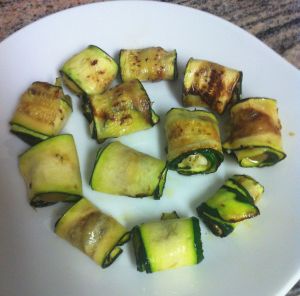
Get thin ribbons of zucchini, I used the old school grater cum slicer that I have. Season the ribbons with a little salt. Ideally you need to grill these for a couple of seconds to get a lovely charred colour and taste but since I don’t have a griller I stuck to use a non-stick pan with almost no oil so as to get the charred effect. You can add a drop or two if your non-stick pan isn’t really non-stick anymore… Turn the ribbons and it would only take 30secs on an extremely hot pan. So you would need to be quick…
For the filling, throw some chopped olives, oregano and tiny crumbles of cheese or cheese shavings. Ensure the cheese is much smaller than the olives in size so olives dominate the flavour of the rolls and also you can make it that tiny bit healthier 😉
Next stuff your filling into the zucchini ribbons and roll away!
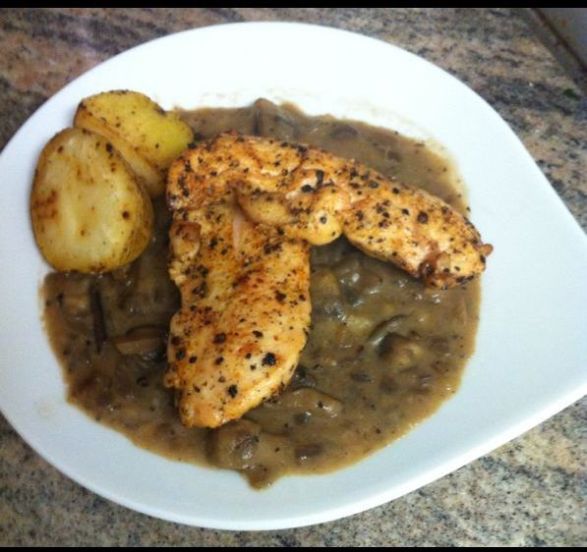
Chicken with boozy mushroom sauce
Being accustomed to Indian food where there are a dozen or more spices in one dish it was difficult (baffling even) for me to imagine a meal with just salt and pepper as spices. But I guess that’s where you fall back on true flavour of the ingredients. So here is my attempt at working with just salt, pepper and a pinch of cayenne…
Ingredients:
2 Medium sized Chicken breasts
Potato – 1 Small cut into half
Mushrooms 100 gms
Flour 1Tbspn
Vodka/White wine 1/4 Cup
1 Small sized Onion – finely diced
Salt – to taste
Black Pepper (freshly cracked) – to taste
Cayenne Pepper – a pinch
Olive oil or butter – 1Tblspn
Lets face the hardest part of this recipe first – its the choice between olive oil and butter. It translates into appeasing your taste buds vs going healthy. For me it was the former (clearly!) so I went for the butter but nothing stopping you from being good! 😉
Now that we are through that, lets get cracking. Take the chicken and add some salt, freshly cracked black pepper and a pinch of cayenne and rub these in. Let it rest for 5mins until you chop the mushrooms and onions. Next, in a non-stick pan add some olive oil or butter put the chicken breast in till you get a light golden colour on both sides but do not fully cook! Put the two pieces of potatoes in the pan, sprinkle salt and get a nice golden colour to the base of the flat face of the potatoes. As earlier make sure you do not cook them fully. In a preheated oven, add the chicken and the potatoes to cook for about 20mins at 280 degs.
For the sauce use the same pan & oil you used for frying the chicken to not lose the lovely flavours, add extra oil/butter if needed. Add the onions & cook only till they are translucent do not wait for them to get brown/crispy. Next add the mushrooms, salt, pepper and let it cook till the mushrooms are soft. Next add the booze and stir till it evaporates. Here is where you can either add some chicken stock if you like, I personally prefer to stay true to the mushroom & booze flavour so I add a little bit of water and a already mixed flour-water mix to avoid any flour balls in the sauce. Simmer until the sauce till it thickens and its done !
Thai steamed Fish
Healthy, easy and tasty are things that everyone wants their meal to be but lets face it getting all three of them together is rare. Don’t those curly fries or sausages look way better than what the salad bar has to offer? Believe me you’re not alone, I have been guilty of picking sausages, mash & fried chicken over all those healthy looking not-so-tasty things.
Eaten by my guilt decided to look for any dish that was healthy (not a drop of oil) and tasty and most importantly something that would be hot. Thai-style steamed fish is just the thing that meets all of the criteria and the best thing is it is easy and takes about 15 mins only. Which makes it something you could try making on a weekday!
Ingredients:
White fish fillets
Chopped ginger
Chopped garlic
Light soy sauce
Sea salt
Coarsely ground red chilly to sprinkle
Some spinach or bok choy
In a foil put all of the ingredients and make a package out of it making sure there is some room for the steam to escape. Steam for 15 mins and enjoy this with rice or cous cous if you want to go healthier!
Mediterranean Grilled Chicken
I was tired of having the regular grilled chicken recipes with ginger, garlic and herbs. Was craving a new kind of grilled chicken which wasnt very unhealthy. Came across this recipe (thankfully!). Made use of dates syrup – something I havent ever used before. Was quite hesitant about it at the start but am glad I tried it! The Mediterranean grilled chicken was absolutely delightful and a refreshing change! Hope you enjoy it as much as I did.
Ingredients:
- 3 Chicken thighs on the bone
- 1 red pepper
- 6-7 baby potatoes (I added more because I love roasted baby potatoes)
- 1 large onion – chopped into big squares with the layers separated
- 8tbsp date syrup or pomegranate molasses
- 1 tspn Cayenne pepper
- 1 tbsp Cumin seeds
- 2 Green chillies – with seeds just slit from the center
- 1 lemon
- Handful of chopped parsley
- Handful of chopped coriander
- 2tbspn coarsely ground garlic cloves
- 2tbspn coarsely ground ginger
- Salt to taste
- Black pepper to taste
- 30gms Butter
- Olive oil
Instructions couldn’t be more straightforward – just throw the ingredients together and marinate for an hour. The only complexity while marinating the chicken comes from the use of lemon. Use the juice of half a lemon and the zest from it for the marinade. While the other half just cut into large pieces and add to the marinating chicken. This would give off a great fragrant freshness from the lemon. Also, dont shun away from adding the molasses even if you arent paricularly fond of sweet grilled chicken because it perfectly balances the heat from the black pepper, cayenne pepper and the green chilles (with the seeds). So you will be just fine! 🙂
An hour later in a preheated oven grill at about 200 degs for roughly 40mins or depending on how big the chicken pieces are. Before putting the marinated chicken to grill add some butter to the chicken pieces for a nice crispy coating. Do ensure that before serving you remove the whole lemon pieces.(Sorry, dont have a picture of what it looked liked once it was done – my energies were directed towards downing it 😉 )
You can have a couple of quick and easy sides to go with this. One can be olives drizzled with dried oregano. Another can be a yoghurt based mint sauce with some finely chopped cucumbers. If you havent really thought of what this would go well with and haven’t got the time to do a full blown bread to go with this, you could do a quick tabouleh which is a healthy salad made from coarsely broken wheat with parsley and a bunch of other veggies thrown in.

Son-in-law Eggs
Quite a weird name for a lovely Thai dish – I made sure I read it twice over to ensure my eyes weren’t playing tricks with me but the dish is indeed called son-in-law eggs. Have no idea about the origin of the name but I do know its a popular Thai egg dish. To make things even better it is an easy egg dish!
Ingredients:
- Eggs
- 1 Large Onion – finely chopped
- Spring Onion – 1 stalk
- Tamarind – a generous pinch
- Salt to taste
- Sugar – 1tspn
- Fresh coriander – finely chopped
- 2 whole red chillies
To prepare the tamarind sauce :
1. Soak the tamarind in warm water for 10mins.
2. Carefully extract the tamarind water into a pan. Ensure you do not allow the seeds and veins of the tamarind into the pan.
3. Add sugar and bring to a boil.
4. Allow the sauce to simmer and reduce till the consistency seems right.
Directions for the main dish:
1. Boil the eggs – be careful so that the yolk doesnt harden. Normally boil for about 7mins on low flame
2. In a pan roast the whole red chillies till they are dark brown. Make sure you turn on the exhaust before doing that else you would end up having a coughing fit! Keep the roasted chillies aside.
3. In the same pan add some oil and saute the onions till golden brown.
4. Add salt and freshly cut coriander.
5. Add most of the reduced tamarind sauce to the onions and cook well till the sauce sticks onto the onions. Add the roasted red chillies to this mixture and mix.
6. In a pan take some oil to fry the boiled eggs. After shelling the eggs, to the pan add the egg and ensure that all sides of the egg are fried. This gives a nice texture to the egg – crisp on the outside to the firm albumin on the interior and the inner most gooey yolk. In the original dish – the eggs are deep fried but I used 2 table spoons of oil in a non-stick pan and rotated the egg to ensure all sides are crispy.
7. Time to plate up – Add the spring onions for the crunchiness to the dish and the remaining tamarind sauce on top of the egg.
Avocado Shake
This is one of the surprise packages for me. I am not particularly fond of the taste of avocado’s and so was a bit sceptical about the avocado shake but it pleasantly surprised me! I have absolutely loved it and try having it as regularly as possible because of the goodness of avocado’s.
Ingredients:
1 Avocado
3 tablespoons Sugar
400ml Milk
3-4 Cardamom seeds
- Get the flesh out of the avocado. For those of you who haven’t used avocado before, cut the fruit into two apart from the centre seed. After this you should be able to split it into two – one half having the huge seed (as in the image below). After that using a spoon you can easily scoop the flesh out.
Be careful about the avocado’s you pick – ensure they are ripe because raw avocado’s are bitter and barely edible. The best way to check if the avocado is ready is to hold the base of the fruit against your palm and gently apply pressure. If you feel the pressure going through to the tip then its perfect else might be worth waiting another day or 2. - Powder the cardamom seeds.
- Add the avocado flesh, cardamom seed powder, sugar and little milk to the blender and blend till you get a smooth thick paste.
- Finally add all the milk and blend.
And you have heaven in a glass! 🙂 I agree it doesn’t look extraordinary it could be easily mistaken for a pista shake but it tastes incredible! A must try at least for the health benefits of avocado’s. Though after you try it once I believe you will easily fall in love with it and want more!
Apple Fennel Salad
Trying to eat healthy and not sure what to take for lunch to work? I was in the same dilemma when I discovered this apple-fennel salad recipe.

Ingredients
1 apple
1 fennel bulb
Chopped parsley
Salad Greens
Lemon juice
Salt to taste
Pepper to taste
Finely slice the apple and the fennel bulb. When chopping the fennel bulb make sure you remove the hard stuff at the base and if necessary the top layer of the bulb. Add the chopped parsley and salad greens. Add a generous dash of lime. Some salt to taste and pepper for depth to the dish. Shake well and enjoy a guilt free healthy lunch. If you’d like to add more zing to it add very little grated ginger juice just 2 drops would be enough.
Pineapple upside down cake
Never really baked before but want to give it a shot? Well, here is the simplest way to get the feel of it before progressing to the deep waters… This is what I first experimented before going and making a irish cream chocolate cake from scratch (The recipe for that can be found in a different post).
My idea of a warm up was to use some ready cake mixes but have my own little twist to it… That’s when I came up with the idea of a upside down pineapple cake. This one is really easy and yum. Can’t exactly call it a recipe because I used a cake mix here but I am sure to try making this one from scratch also.
Used a plain vanilla cake mix followed the instructions at the back. Added a little bit of the pineapple syrup to the cake mix so that it had both the mildness of vanilla and the freshness of pineapple. Before pouring the mixture into a tray, I added fresh pineapple pieces to the bottom of the tray. The fresh pineapple added moistness to the cake. Once cooked, upturn the cake to get your lovely upside down pineapple cake! 🙂
Just a word of warning, this cake wouldn’t really last very long due to the fresh pineapples and the pineapple syrup so bake just what you know you can consume in a couple of days.
Again forgive me for the quality of the picture… But I dont think I will ever get nice pictures of food unless I cook when I am too full to eat or not enthusiastic enough to try (which never really happens 😉 ).
Irish Cream Chocolate Cake
One of my first experiments with cakes and turned out well. 🙂 I like the taste of Baileys which is an Irish liquer. Coupling that with chocolate was like a match made in heaven for me. Yet again forgive me for the poor photography, I was just to eager to try it (as always) that clicking a nice picture wasn’t really my priority so settled with a phone camera. Not to brag but it looked muchh better than what the photo says…

Here is the recipe:
Ingredients:
150gm Dark Chocolate
3large eggs or 4small eggs
100 gm butter
100ml milk
225gm caster sugar
225gm self raising flour
2tbsp cocoa powder
4-5tbspn baileys
Steps:
- Take the butter and chocolate and melt those on a low heat. Try not using the microwave or the low flame as there is a good possibility of burning the butter. The best way to achieve this would be to melt these over steam (A steam bath or a double boiler would be of help).
- Once these are melted add the milk while stirring continuously
- Cream the eggs and caster sugar mix until creamy. This is best done with an electric whisk for 8-10mins. If you do not have an electric whisk, I would suggest you prepare the creamy mixture before step 1 and 2 as it would take a great deal of time.
- Once the creamy mixture is ready, add the melted butter-chocolate-milk mix prepared in step 1 and 2 while continuously stirring.
- Once it is thoroughly mixed, add the cocoa powder, all purpose flour after sieving. Remember not to be harsh while adding these and mixing. Gently fold these in. In the end add the baileys and fold again.
- Grease the trays with butter and sprinkle some all purpose flour before pouring the mixture above.
- Place the trays to an oven preheated to 180degrees/350F and cook for 20mins. If the mixture was a little less viscous than expected, the mixture would take longer to cook. Do the knife test before taking the cake out.
For the frosting
50gm butter
175gm icing sugar
2tbspn cocoa powder
3tbspn baileys
100gm Cream cheese (Philadelphia cheese)
Mix all the above ingredients thoroughly ensuring there are no lumps and spread over the cake once cooled… Then coming to my favourite part of each recipe…. Cut the slices and bite into the gooyness of chocolate and baileys…. Feel the BLISS! 🙂 (Forget the calories! 😉 )



Comments